![What is H3 Max Camera Controls (Multi-Angle) & How To Use It? [2026]](https://refinery.fal.media/url/https%3A%2F%2Fv3b.fal.media%2Ffiles%2Fb%2F0aabbf2b%2Fq8usbuG4heGtr4-AYyqfk.jpg/tr:w-1920,q-80/q8usbuG4heGtr4-AYyqfk.webp)
H3 Max Camera Controls handles a narrow problem.
You have a photograph that already works, and what it needs is motion that leaves everything inside the frame alone.
The model takes that image plus a set of camera positions and returns a clip in which only your viewpoint travels.
We launched it as the world's fastest 3D video model, and it runs on fal at minimax/h3-max/camera-controls.
This guide covers what H3 Max Camera Controls is, how camera trajectories are written, how to run one in the playground and through the API, which source images suit it, and what a clip costs.
TL;DR
H3 Max Camera Controls converts a single photograph into video with a moving camera and a stationary subject.
Shots are controlled through camera keyframes, and each keyframe carries a normalized timestamp plus the camera's horizontal angle, vertical angle, and distance.
Clips run 5 to 15 seconds at 480P, 768P, or 1080P, where the 1080P tier is a refinement pass over a native 768P render.
The cost to access H3 Max Camera Controls on fal is $0.05 per second for 480p, $0.08 for 768p, and $0.16 for 1080p.
The prompt field arrives pre-filled with a freeze instruction, and overwriting that text is what lets motion back into the frame.
What is H3 Max Camera Controls?
H3 Max Camera Controls is a MiniMax H3 Max endpoint on fal that generates video from one image and a camera path, keeping every element of the scene in position while the viewpoint moves around it.
It's H3 Max with a resident camera adapter attached, and that adapter is what separates this endpoint from ordinary image-to-videos:
| Property | Value |
|---|---|
| Endpoint | minimax/h3-max/camera-controls |
| Model family | MiniMax H3 Max |
| Required input | One image |
| Camera control | Keyframed trajectory |
| Duration | 5 to 15 seconds |
| Resolutions | 480P, 768P, 1080P |
| Default resolution | 480P |
| Azimuth travel cap | 32 total turns |
| Commercial use | Yes |
Here's how that looks in action:
Generated using H3 Max Camera Controls on fal, an AI model from MiniMax.
What does H3 Max Camera Controls generate that standard image-to-video doesn't?
H3 Max Camera Controls produces a camera move across a static scene.
A standard image-to-video endpoint produces the reverse, animating the contents of the frame while the camera mostly holds position.
You can see the split in what stays fixed.
A face holds one expression for the full clip, and liquid in a glass stays at exactly the level it was photographed at.
What changes is where you're standing.
Product photographers get the most obvious use out of this, since one good frame can carry an entire listing once you're able to circle it.
Architectural images benefit for similar reasons.
Beyond that, anything where the composition is already settled and the only missing piece is movement in the lens.
If the subject itself has to do something, H3 Max Camera Controls is the wrong endpoint, and the standard MiniMax H3 Max image-to-video routes cover that case.
How does a camera trajectory work in H3 Max Camera Controls?
A camera trajectory in H3 Max Camera Controls is an ordered list of poses, and the model interpolates the viewpoint between them.
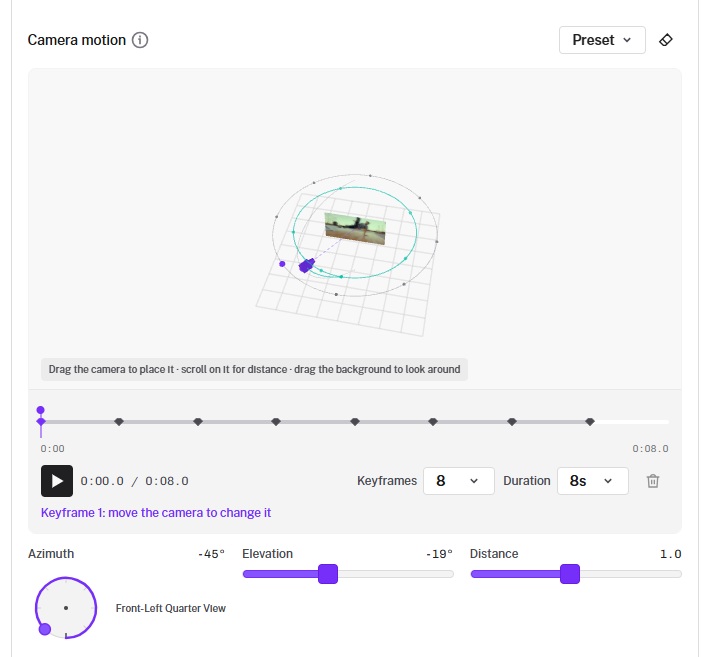
A pose is described by four fields.
| Field | What it does |
|---|---|
time | Normalized position in the clip, where 0 is the first frame and 1 is the last |
azimuth | Horizontal angle around the subject, in degrees, signed |
elevation | Vertical angle, in degrees |
distance | Camera distance from the subject in normalized scene units |
How keyframe timing shapes the move
Keyframe times in H3 Max Camera Controls are normalized between 0 and 1, so a pose at 0.5 lands at the midpoint of a 5-second clip and a 15-second clip alike.
That means duration can change later without anyone touching the path.
In the fal schema, you'll also find what happens outside the range you define.
Your opening pose applies backward to frame one, and your closing pose applies forward to the last frame.
A first keyframe placed at 0.4 therefore leaves the clip locked on a single frame for almost half its length before the move begins.
Some editors want precisely that, and I use it deliberately in one of the paths further down. The failure mode is discovering it by accident.
How azimuth direction works
Azimuth in H3 Max Camera Controls is signed, and the model travels the arc you write, not the shortest arc between two angles.
A full turn in one direction is 0 to 360, and the same turn the other way is 0 to -360.
We cap cumulative travel at 32 turns, well past what 15 seconds can show legibly.
Crossing the zero point catches people out.
A pose at 20 following a pose at 300 reads as 280 degrees of backwards travel, because the value is taken literally.
You can keep the sequence climbing and write 380 in place of 20.
How do you run H3 Max Camera Controls in the fal playground?
Running H3 Max Camera Controls in the playground takes five steps, all on a single page.
Open the model at models/minimax/h3-max/camera-controls and sign in, creating an account first if you don't have one.
Add your source image by dragging a file in, pasting from the clipboard, or providing a URL. Accepted types are jpg, jpeg, png, webp, gif, avif, heic, and heif.
Set resolution and duration. Duration is a dropdown of whole seconds from 5s to 15s.
Build the camera path in the Camera motion panel. A 3D stage shows your image standing upright on a grid, with a timeline of keyframe markers beneath it and controls for azimuth, elevation, and distance below that. Drag the camera marker to place it, scroll on it to change distance, and drag the background to look around the stage. A Preset menu is available in the top right corner.
Press Run, or use Ctrl and Enter.
Here's how that looks in our playground:
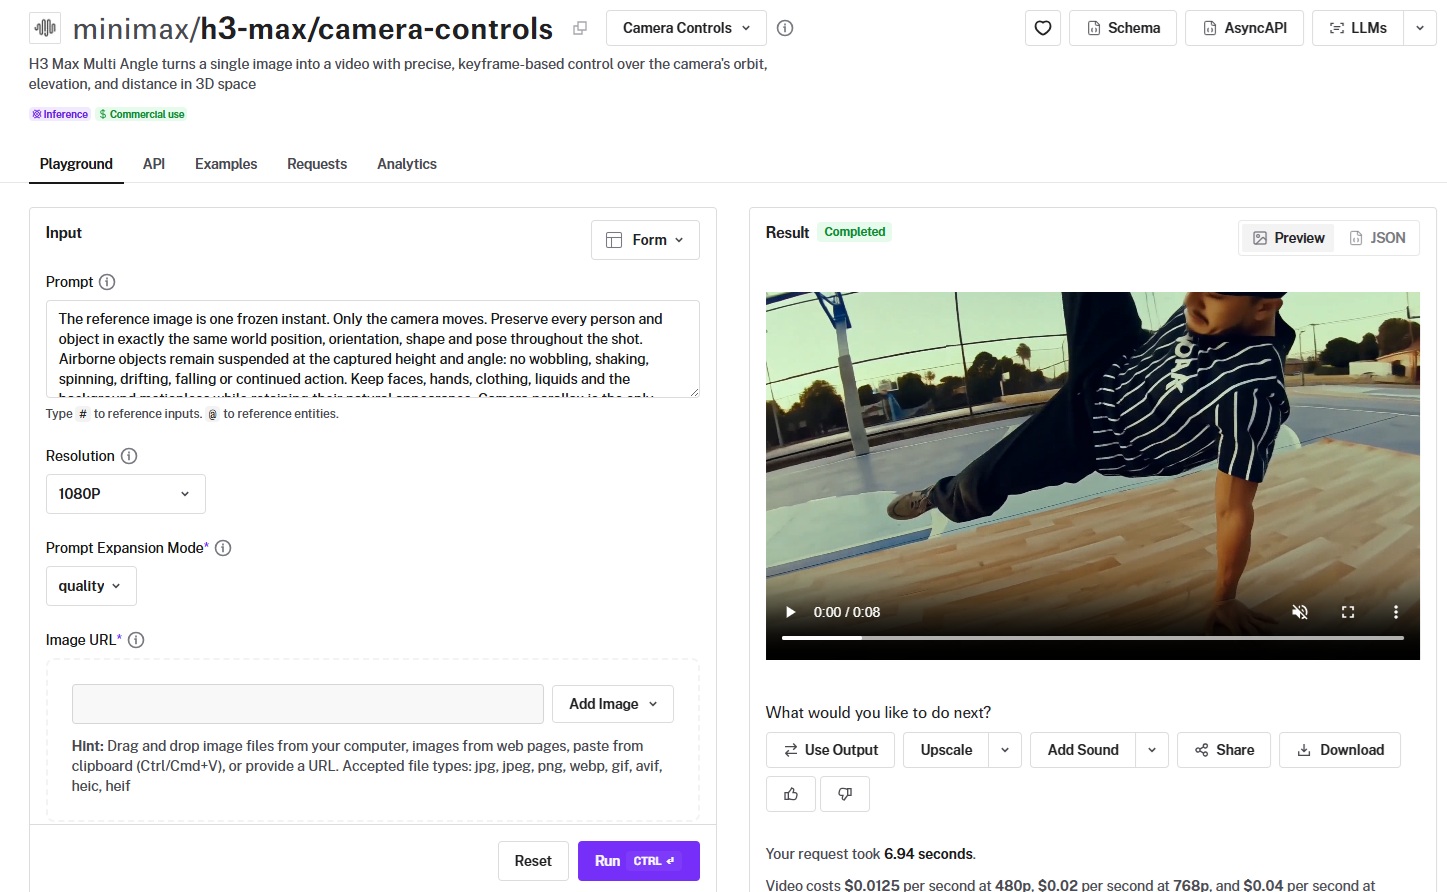
A keyframe count selector appears next to the duration dropdown, and choosing a number spaces that many markers evenly across the timeline for you.
Click each marker in turn and move the camera to set that pose.
Why the default prompt in H3 Max Camera Controls is a freeze instruction
The prompt field on the H3 Max Camera Controls playground arrives pre-filled with an instruction to hold the scene still, and that text does more work than its length suggests.
Here it is as shipped:
The reference image is one frozen instant. Only the camera moves. Preserve every person and object in exactly the same world position, orientation, shape and pose throughout the shot. Airborne objects remain suspended at the captured height and angle: no wobbling, shaking, spinning, drifting, falling or continued action. Keep faces, hands, clothing, liquids and the background motionless while retaining their natural appearance. Camera parallax is the only source of apparent movement. Follow the supplied camera path smoothly, easing into and out of the move. Start and finish at the original framing and perspective, with unchanged lighting and focal length. No cuts, zoom, morphing or added objects.
The clause about airborne objects is what keeps a splash frozen mid-air across an entire orbit.
The line about parallax tells the model that anything changing on screen should be a consequence of your angle changing and nothing else.
What happens when you replace the default prompt
Replacing the default prompt on H3 Max Camera Controls with a description of your scene removes the instruction that was keeping the scene frozen, which is when the model starts inventing motion.
Two versions of one shot, same source image and same trajectory, make the point.
Prompt kept at the default: Default freeze instruction, unedited.
Generated using H3 Max Camera Controls on fal, an AI model from MiniMax.
Prompt replaced with a scene description: A cut-crystal tumbler of amber whiskey on a walnut bar, a single ice cube mid-drop, low evening light raking across the glass.
Generated using H3 Max Camera Controls on fal, an AI model from MiniMax.
How to add scene detail without losing the freeze
You want to append your scene detail to the default text on H3 Max Camera Controls and keep the freeze language intact.
The reference frame is a single frozen instant. Preserve the cut-crystal tumbler, the walnut bar top, the suspended ice cube, and the direction of the evening light exactly as captured. Only the camera moves. No scene motion, no added objects, no change in focal length.
That version names the elements you're most worried about while the freeze instruction stays where it belongs.
One further setting touches your text before generation.
prompt_expansion_mode controls how much effort goes into rewriting it, with balanced returning in about a second and quality spending up to 30 seconds on a richer version.
When expansion changes your text, the rewritten version comes back in the expanded_prompt field, so you can read what was actually sent. The field is null when nothing changed.
How do you build a camera path in H3 Max Camera Controls?
Building a camera path in H3 Max Camera Controls means placing poses on the timeline and letting the model interpolate between them.
Pacing follows from how you distribute those poses across the timeline.
Matching angular steps to time steps gives even pacing across the clip, allowing for the easing the default prompt asks for at each end of the move.
A mismatch produces acceleration in the middle, which reads as intent when you meant it and as an error when you didn't.
Two habits carry across most paths:
Setting elevation a few degrees away from zero keeps the subject from flattening, because a perfectly level orbit gives the model the thinnest possible read on the object at every angle.
Holding distance constant keeps a rotation reading as a rotation, and varying it turns the same path into an approach.
falMODEL APIs
The fastest, cheapest and most reliable way to run genAI models. 1 API, 100s of models
Which source images work best with H3 Max Camera Controls?
The images that work best in H3 Max Camera Controls have genuine separation between the subject and whatever is behind it.
Separation is what gives the camera something to move around.
A few things made a visible difference in my testing.
Depth in the frame beats a flat backdrop, because a subject standing clear of its background produces parallax the moment your angle shifts.
Directional light holds its logic across a move better than flat frontal light does, since the model has a clear sense of where shadows belong as you travel.
Reflective and transparent surfaces are the hardest case, and glass in particular asks the model to be correct about something the photograph only showed from one position.
The further a path travels from the original viewpoint, the more the model is composing surfaces the photograph never contained.
Ninety degrees around a ceramic bowl asks very little of it.
Three hundred degrees around a portrait asks for a hairline the camera never saw.
Wider orbits belong on objects with regular or symmetrical geometry.
What are the important H3 Max Camera Controls settings?
The settings below change what you get out of H3 Max Camera Controls.
Everything else on the endpoint is operational.
| Setting | Values | Default | What it controls |
|---|---|---|---|
resolution | 480P, 768P, 1080P | 480P | Output resolution. 1080P is a latent refinement pass over a native 768P source. |
duration | 5 to 15 | 5 | Clip length in whole seconds. Trajectories are unaffected, since time is normalized. |
prompt_expansion_mode | balanced, quality | balanced | Effort spent rewriting the prompt. Balanced returns in about a second, quality takes up to 30. |
seed | Integer | Random | Fixes the generation so you can compare trajectory variations against a stable result. |
enable_safety_checker | true, false | true | Safety checker on the generation. |
There's also sync_mode, which returns the video as base64 in place of a CDN URL, and a timings object that reports denoising time on the GPU backend when the route supplies it.
How resolution affects what you spend
As the 1080P tier refines a 768P render, the extra money buys sharpness on an image the model has already composed.
The practical effect is that resolution is a decision you can safely defer.
A camera path is resolution-independent, so early passes at 480P should show you whether a move works for under a third of the 1080P cost, and you promote only the take you're keeping.
How do you call H3 Max Camera Controls through the fal API?
Calling H3 Max Camera Controls through the fal API is a single queued request, and the only unusual part of the payload is the camera_trajectory array.
Install the client:
bash
npm install --save @fal-ai/clientSet your key in the runtime:
bash
export FAL_KEY="YOUR_API_KEY"Then submit:
javascript
import { fal } from "@fal-ai/client";

const result = await fal.subscribe("minimax/h3-max/camera-controls", {
  input: {
    prompt_expansion_mode: "balanced",
    image_url: "https://storage.googleapis.com/falserverless/example_inputs/hailuo23/pro_i2v_in.jpg"
  },
  logs: true,
  onQueueUpdate: (update) => {
    if (update.status === "IN_PROGRESS") {
      update.logs.map((log) => log.message).forEach(console.log);
    }
  },
});

console.log(result.data);
console.log(result.requestId);
H3 Max Camera Controls pricing on fal
It costs $0.05 per second at 480p, $0.08 per second at 768p, and $0.16 per second at 1080p to use H3 Max Camera Controls on fal.
| Clip | 480p | 768p | 1080p |
|---|---|---|---|
| 5 seconds | $0.25 | $0.40 | $0.80 |
| 8 seconds | $0.40 | $0.64 | $1.28 |
| 15 seconds | $0.75 | $1.20 | $2.40 |
Billing tracks output length only, so path complexity costs nothing extra.
A ten-pose descent and a two-pose approach cost the same at the same duration, which is a reason to build the move you actually wanted.
There's no subscription and no commitment on our side, so the bill tracks what you generated.
Recently Added






Start moving the camera on fal
H3 Max Camera Controls takes the frame you already got right and returns every other angle on it.
You can upload a still with some depth in it, drop two poses on the timeline, and look at what the move does before committing to a longer clip.
The playground is at models/minimax/h3-max/camera-controls, and you can set up an account there if you don't already have one.
Frequently asked questions
Does H3 Max Camera Controls need a prompt?
No.
H3 Max Camera Controls ships with a default prompt instructing the model to freeze the scene, and omitting the field applies the documented default.
Write your own only when you want to name specific elements that must be preserved, keeping the freeze language when you do.
Do you have to rebuild the camera path when the clip length changes?
No.
Keyframe times on H3 Max Camera Controls are normalized, so one path applies at any supported duration.
A longer clip stretches the same move across more frames.
Why did the camera travel the long way around?
Azimuth values on H3 Max Camera Controls are read literally, so a pose at 20 following a pose at 300 produces 280 degrees of reverse travel.
Keep the numbers climbing through the boundary and write 380 in place of 20.
What's the difference between H3 Max Camera Controls and H3 Max Director?
H3 Max Camera Controls generates a fixed-length clip from one image and a camera path, holding the scene still throughout.
H3 Max Director opens a streaming session that generates continuous video and audio you steer with new prompts while it plays.
Does 1080P generate more detail than 768P?
The 1080P tier on H3 Max Camera Controls is documented as a latent refinement from a native 768P source.
It sharpens the 768P render and doesn't compose additional content at the higher resolution.
![AI Character Consistency: Prompts & Workflows [2026]](https://refinery.fal.media/url/https%3A%2F%2Fv3b.fal.media%2Ffiles%2Fb%2F0aab7c4d%2Fkwxu6yccgCYhxPol2ex4f.jpg/tr:w-1280,q-80/kwxu6yccgCYhxPol2ex4f.webp)
![How To Create a Multi-Angle Video With Seedance 2.5? [2026]](https://refinery.fal.media/url/https%3A%2F%2Fv3b.fal.media%2Ffiles%2Fb%2F0aac4654%2Fl_XpD5ZyeaxkHTMN-k3Na.jpg/tr:w-1280,q-80/l_XpD5ZyeaxkHTMN-k3Na.webp)